This tutorial describes the three simplest techniques to generate reports in Selenium. All of these methods produce user-friendly, intuitive, and informative reporting.
- Introduction to Reporting in Selenium
- The Qualities of a Good Report
- Using TestNG to Generate Reports
- Using JUnit for Reporting in Selenium Tests
- Pre-requisite to Generate JUnit Reports
- Create a JUnit Test Watcher Class
- Prepare a Sample JUnit Test Suite
- HTML Report Generation Using JUnit
- Using Extent Library to Generate Reports
- Summary – Reporting Tools for Selenium
Introduction to Reporting in Selenium
A perfect test automation tool is required for the successful execution of the testing requirements in the Agile process. Multiple factors make a robust automation framework. One such element is reporting.
Automation reports are not just an indicator of success or failure but also point out their root cause. So, you should use the right method to generate reports in Selenium. That’s where this post would lead you to make a decision.
The Qualities of a Good Report
Before we proceed with the topic, the first thing for you is to understand clearly – What is the purpose of reporting in automation testing? The simple reason behind this is a good test report serves as a health certificate for your Project.
Please note that only a successful report can give you the confidence to release the product to the customer. If it shows some shortcomings, you need to address them later.
What are the essential qualities of a good test report?
The following table captures the essential qualities a test automation report should have.
| Quality | Description |
|---|---|
| Brevity | A report should be brief and concise. It should reveal the total number of successes as well as failures. |
| Trackability | Captures all the footprints that could lead to the root cause of a failure. |
| Traceability | The report must provide the ability to review the following. – Historical data for test cases and failures – Age of a particular defect |
| Sharable | It should support a format you can share through email or integrate with CI tools like Jenkins/Bamboo. |
| Coverage | The report should highlight the test coverage for the following. – Test coverage of the module under test. – Test coverage of the application under test. |
The above table gives you a fair idea of how a good test report can maximize the returns on investment. Let’s switch to our main topic – exploring the three ways to generate reports in Selenium.
Selenium Webdriver comes without a built-in reporting feature. However, plugins like TestNG and JUnit can add this functionality.
Using TestNG to Generate Reports
TestNG library brings a very convenient reporting feature. Once you execute the tests, TestNG generates a test output folder at the project root. It combines two kinds of reports.
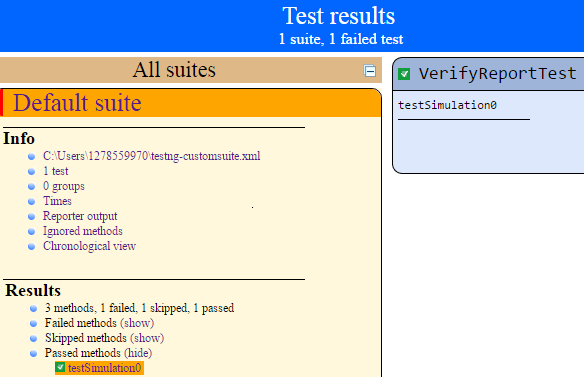
Detailed Selenium Report in TestNG
You can find this report in the <index.html> file. It combines detailed information like the errors, test groups, execution time, step-by-step logs, and TestNG XML file.
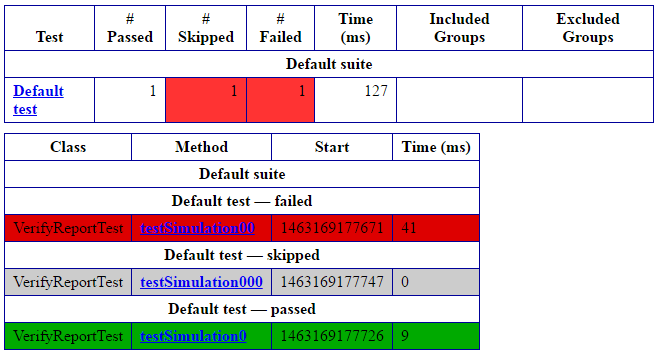
Summary Report in Test NG
It is the trimmed version and informs about the number of “Passed”/”Failed”/”Skipped” cases. You can see it from the <emailable-report.html> file. It’s an email-friendly report you can embed and share with the stakeholders.
Sample Code to Generate Test Report
The TestNG framework provides two methods for generating reports in a Selenium project.
- The most common method is using the TestNG <ITestListener> Interface.
- Another method is to use the <IReporter> Interface.
In this blog post, we’ll cover the application of the <ITestListener> Interface. You’ll have to create a TestNG project in Eclipse.
Generate Reports Using the <ITestListener> Interface.
import org.testng.ITestContext;
import org.testng.ITestListener;
import org.testng.ITestResult;

public class GenerateReport implements ITestListener {

    @Override
    public void onStart(ITestContext arg0) {

        System.out.println("+Begin test: " + arg0.getName());
    }

    @Override
    public void onTestStart(ITestResult arg0) {

        System.out.println(" Starting test: " + arg0.getName());
    }

    @Override
    public void onTestSuccess(ITestResult arg0) {

        System.out.println(" Test passed: " + arg0.getName());
    }

    @Override
    public void onTestFailure(ITestResult arg0) {

        System.out.println(" Test failed: " + arg0.getName());
    }

    @Override
    public void onTestSkipped(ITestResult arg0) {

        System.out.println(" Test ignored: " + arg0.getName());
    }

    @Override
    public void onFinish(ITestContext arg0) {

        System.out.println("-End test: " + arg0.getName());
    }

    @Override
    public void onTestFailedButWithinSuccessPercentage(ITestResult arg0) {

        // TODO Auto-generated method stub
    }
}
Verify the Report Generation Process
import org.testng.Assert;
import org.testng.annotations.Listeners;
import org.testng.annotations.Test;

@Listeners(GenerateReport.class)
public class VerifyReportTest {

    @Test
    public void testSimulation0() {

        Assert.assertTrue(true);

    }

    @Test
    public void testSimulation00() {

        Assert.assertTrue(false);

    }

    // Test case <testSimulation000> depends on the intentionally
    // failed test case <testSimulation00>

    @Test(dependsOnMethods = "testSimulation00")
    public void testSimulation000() {

    }
}
Also Read: Learn to Create a TestNG Project in Eclipse
Using JUnit for Reporting in Selenium Tests
JUnit is another useful framework that can add the ability to generate reports in Selenium. It provides the JUnit <TestWatcher> class to introduce reporting ability.
The JUnit’s TestWatcher class has the <failed()> and <succeeded()> methods which you can override. The JVM would call them automatically whenever it smells a pass or failure.
Pre-requisite to Generate JUnit Reports
We’ve just summarized the summary of the steps that you can use to generate reports using the JUnit plugin.
- Create a new Java class (name it JUnitTestReporter) that applies the JUnit rules with the help of the TestWatcher() class.
- Override the <succeeded()> method so that the names of passed tests could be displayed at the console with the <Passed> status.
- Override the <failed()> method so that the names of the failed tests could appear in the console with the <Failed> status.
- Create a sample test class as <JUnitSampleTest> which must extend the <JUnitTestReporter> class to utilize the overridden <succeeded()> and <failed()> methods.
Now we’ll explain how simple it is to work with JUnit so that you can quickly generate the summary of the test execution.
Create a JUnit Test Watcher Class
Create a simple project in Eclipse and add the below file <JUnitTestReporter.Java> to your project. This file will display the report in the Eclipse console.
import org.junit.Rule;
import org.junit.rules.TestRule;
import org.junit.rules.TestWatcher;
import org.junit.runner.Description;
import org.junit.runners.model.Statement;

public class JUnitTestReporter {

    @Rule
    public TestRule junitWatcher = new TestWatcher() {

        @Override
        public Statement apply(Statement base, Description description) {
            return super.apply(base, description);
        }

        @Override
        protected void succeeded(Description description) {
            System.out.println(description.getDisplayName() + " " +
                "Test Passed!");
        }

        @Override
        protected void failed(Throwable e, Description description) {
            System.out.println(description.getDisplayName() + " " +
                e.getClass().getSimpleName());
        }
    };
}
Prepare a Sample JUnit Test Suite
Also, add the below file <JUnitSampleTest.Java> to your project. It’ll be the main test file which you’ll execute from the Eclipse.
import static org.junit.Assert.assertTrue;

import org.junit.Test;

public class JUnitSampleTest extends JUnitTestReporter {

    @Test
    public void sampleTest0() {
        assertTrue(1 < 2);
    }

    @Test
    public void sampleTest1() {
        assertTrue(1 > 2);
    }

    @Test
    public void sampleTest2() {
        assertTrue(1 < 2);
    }

    @Test
    public void sampleTest4() {
        assertTrue(1 > 2);
    }
}
When you run the above JUnit tests from Eclipse, it’ll show you the test results in Eclipse as captured in the below screenshot. The downside to this technique is that it doesn’t save the output in an HTML file.
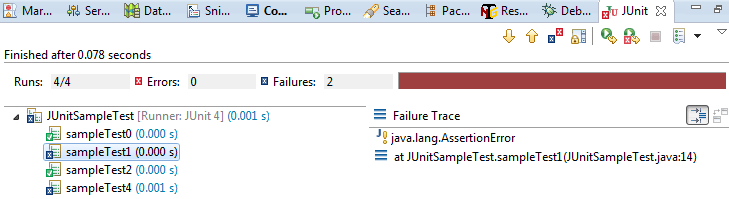
But you can generate an HTML report by modifying the above code. We’ve given the technique to produce the test summary in the next section.
HTML Report Generation Using JUnit
We’ll create a new JUnit class that would enable the HTML report generation. This class will also override the TestWatcher methods to implement the desired features.
- We’ll define two static members; one is a File object and the second one is BufferWriter’s handle that will help us add the test execution summary to the report file.
- We’ll use the following JUnit annotations.
- @BeforeClass – It’ll help us define the setup() method. It’ll create/open the HTML report file as per the situation.
- @AfterClass – We’ll use it to execute clean-up tasks. It’ll also update the HTML report file to add the HTML footer and close all the open handles.
- We’ll override the following two methods.
- <succeeded()> – It’ll write the names and status of the test cases passed during execution.
- <failed()> – It’ll log the names and state of the test cases that failed during execution.
Now, you’ll find the source code of the <JUnitHTMLReporter> class.
import java.awt.Desktop;
import java.io.BufferedWriter;
import java.io.File;
import java.io.FileWriter;
import java.io.IOException;
import java.text.DateFormat;
import java.text.SimpleDateFormat;
import java.util.Date;

import org.junit.AfterClass;
import org.junit.BeforeClass;
import org.junit.Rule;
import org.junit.rules.TestRule;
import org.junit.rules.TestWatcher;
import org.junit.runner.Description;
import org.junit.runners.model.Statement;

public class JUnitHTMLReporter {

    static File junitRpt;
    static BufferedWriter junitWrt;

    @BeforeClass
    public static void setUp() throws IOException {

        String junitFile = System.getProperty("user.dir") +
            "\\junitReportFile.html";
        DateFormat dateFormat = new SimpleDateFormat("dd-MMM-yyyy HH:mm:ss");
        Date date = new Date();
        junitRpt = new File(junitFile);
        junitWrt = new BufferedWriter(new FileWriter(junitReport, true));
        junitWr.write("<html><body>");
        junitWr.write("<h1>Test Execution Summary - " + dateFormat.format(date) +
            "</h1>");

    }

    @AfterClass
    public static void tearDown() throws IOException {

        junitWrt.write("</body></html>");
        junitWrt.close();
        Desktop.getDesktop().browse(junitReport.toURI());

    }

    @Rule
    public TestRule watchman = new TestWatcher() {

        @Override
        public Statement apply(Statement base, Description description) {
            return super.apply(base, description);
        }

        @Override
        protected void succeeded(Description description) {
            try {
                junitWrt.write(description.getDisplayName() + " " +
                    "success!");
                junitWrt.write("<br/>");
            } catch (Exception e1) {
                System.out.println(e1.getMessage());
            }
        }

        @Override
        protected void failed(Throwable e, Description description) {
            try {
                junitWrt.write(description.getDisplayName() + " " +
                    e.getClass().getSimpleName());
                junitWrt.write("<br/>");
            } catch (Exception e2) {
                System.out.println(e2.getMessage());
            }
        }
    };
}
So, we have a ready-to-use HTML reporter class, all we need now is the JUnit Test class that will extend it and call its methods. The code of this new class is available below.
import static org.junit.Assert.assertTrue;
import org.junit.Test;
public class JUnitHTMLSampleTest extends JUnitHTMLReporter {
@Test
public void sampleTC0() {
assertTrue(1 < 2);
}
@Test
public void sampleTC1() {
assertTrue(1 > 2);
}
@Test
public void sampleTC2() {
assertTrue(1 < 2);
}
@Test
public void sampleTC3() {
assertTrue(1 > 2);
}
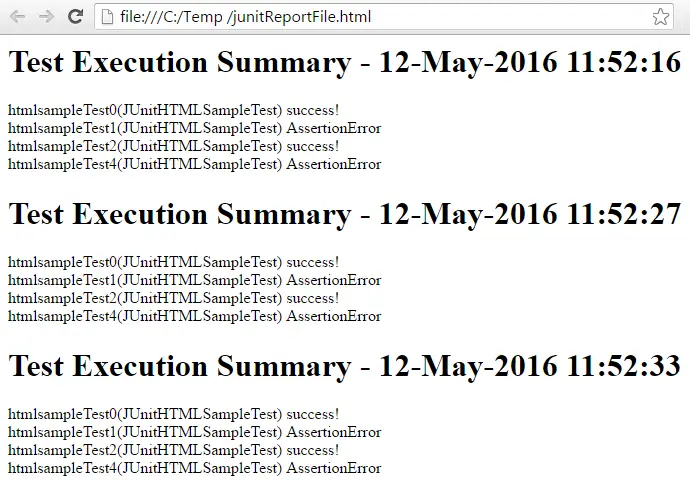
}When you run the above class file as a JUnit test case, the <junitReportFile.html> will get generated. It’ll contain the test case’s pass/fail info and look like the report in the following image.
Using Extent Library to Generate Reports
The third and last technique for generating a stylish report is using the <Extent Report> library. It comes with a rich set of features.
- Ability to generate dynamic HTML logs
- Represents test case status with the help of Pie Charts
- Creates a step-by-step test case summary
- Ability to filter reports based on test status
- Maintains execution history
- It captures details like OS, Memory, Java version, and so on
- Can attach error screenshots within the report
You can download the Extent library from here: https://github.com/extent-framework
Once you have the reporting library, then follow the below steps to use them in a Selenium Webdriver project.
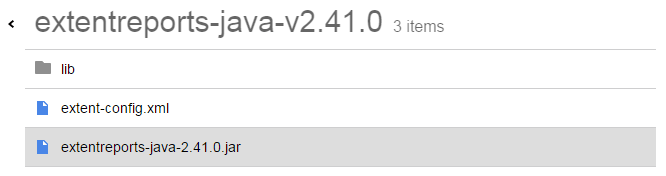
- Create or open a demo project in Eclipse
- Add the Jar files shown in the above picture as external libraries to your project.
- Also, make sure to add the Jars that are in the <lib> folder else the exception may occur at run-time.
Now, we are attaching the source code of the sample Java program that we created for the Extent library report validation. You can use the below Java file as is in your demo project.
import org.openqa.selenium.WebDriver;
import org.openqa.selenium.firefox.FirefoxDriver;
import org.testng.Assert;
import org.testng.annotations.Test;
import com.relevantcodes.extentreports.ExtentReports;
import com.relevantcodes.extentreports.ExtentTest;
import com.relevantcodes.extentreports.LogStatus;
public class ExtentReportTest {
@Test
public void verifySeleniumBlog() {
String extfile = System.getProperty("user.dir") +
"\\extfile.html";
String extimg = System.getProperty("user.dir") +
"\\extimg.png";
// Create object of extent report and specify the report file path.
ExtentReports ext = new ExtentReports(extfile, false);
// Start the test using the ExtentTest class object.
ExtentTest extTest = ext.startTest("My First Test",
"Verify WebSite Title");
// Launch the FireFox browser.
WebDriver driver = new FirefoxDriver();
driver.manage().window().maximize();
extTest.log(LogStatus.INFO, "Browser Launched");
// Open application.
driver.get("/");
extentTest.log(LogStatus.INFO, "Moved to techbeamers.com");
// get title.
String title = driver.getTitle();
extentTest.log(LogStatus.INFO, "Get the WebSite title");
// Verify title.
Assert.assertTrue(title.contains("Selenium Webdriver"));
extentTest.log(LogStatus.PASS, "Title verified");
// In case you want to take an error screenshot
extTest.log(
LogStatus.INFO,
"Error Snapshot : " +
extentTest.addScreenCapture(extentReportImage));
// Close application.
driver.quit();
extTest.log(LogStatus.INFO, "Browser closed");
// close report.
ext.endTest(extTest);
// writing everything to document.
ext.flush();
}
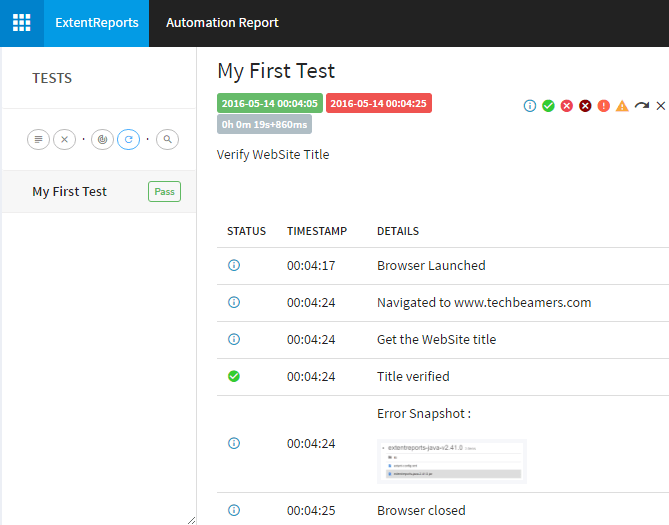
}Once you run the above code, it’ll launch the specified URL in Firefox and produce an intuitive Extent test report. The final test report would look like the one shown in the below screenshot.
So, that was all we wanted to share in this post. We hope it will enable you to use the three distinct methods to generate reports in Selenium. And, you’ll be able to reap the real benefits of the test automation.
Must Read:
Generate Extent Report in Selenium with Python, Java, and C#
Build A Selenium Python Test Suite using Unittest
Selenium WebDriver TestNG Quiz for 2023
100+ Selenium Interview Questions and Answers
Summary – Reporting Tools for Selenium
Today, we discussed traditional and modern ways to generate reports in Selenium. We hope they will be quite useful in your projects.
It’s entirely up to you to choose the reporting mechanism for your test suites. However, you can always ask for help if the above solutions don’t work or are blocked at some point. We’ll try to respond to your questions as soon as possible.
Lastly, our site needs your support to remain free. Share this post on social media (Linkedin/Twitter) if you gained some knowledge from this tutorial.
All the Best,
TechBeamers.