In this post, we will describe the easiest way to create a setup of the Selenium Webdriver project using the Eclipse IDE.
Must Read – Create Selenium 3 Project with Java
We’ve covered the whole process in six main steps, starting from the required Software downloads for creating the Test Project.
If you follow this tutorial correctly, then it will be quite easy to write your first Selenium Test Script.
Let’s first get aware of the prerequisites to start our work.
Pre-requisite
Steps to Download and Install Eclipse IDE
- Before the start, please check if you have the Eclipse IDE installed on your system. If it’s not there on your machine, then please install it from its website.
- For your note, there are different versions of Eclipse available like the Windows-32/64 bit, Linux, and Mac OS X operating systems. Hence, download the latest version of Eclipse that suits your system configuration.
- After the completion of the previous step, locate and start the “eclipse.exe” from the folder where you saved the Eclipse binary. And define a path for the “Workspace,” which you’ll be using to set up the Selenium Webdriver project.
In the subsequent sections, we will outline the necessary steps to set up the Selenium Webdriver project. Please follow them one by one.
Your First Selenium WebDriver Project in Eclipse
We’ve given the bare minimum steps required to set up a Selenium Webdriver project from scratch. Follow Eclipse IDE images for proper guidance.
Step#1: Add a New Java Project in Eclipse IDE
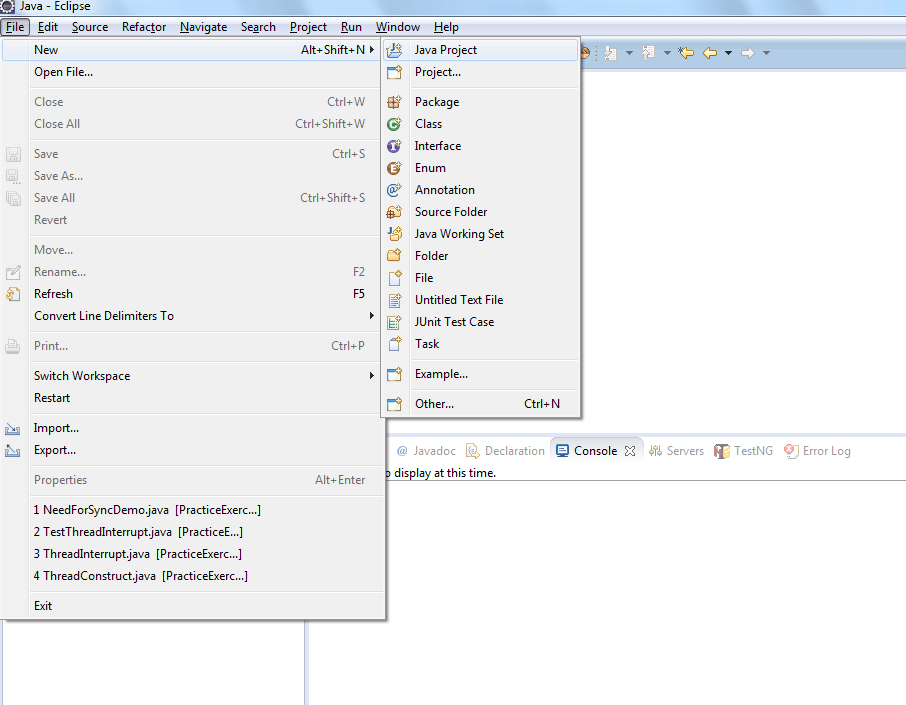
Open Eclipse IDE, as described in the above steps, and select “Java Project” from the list of project types to create a new module.
This project will get automatically saved to the Workspace that you would have specified previously.
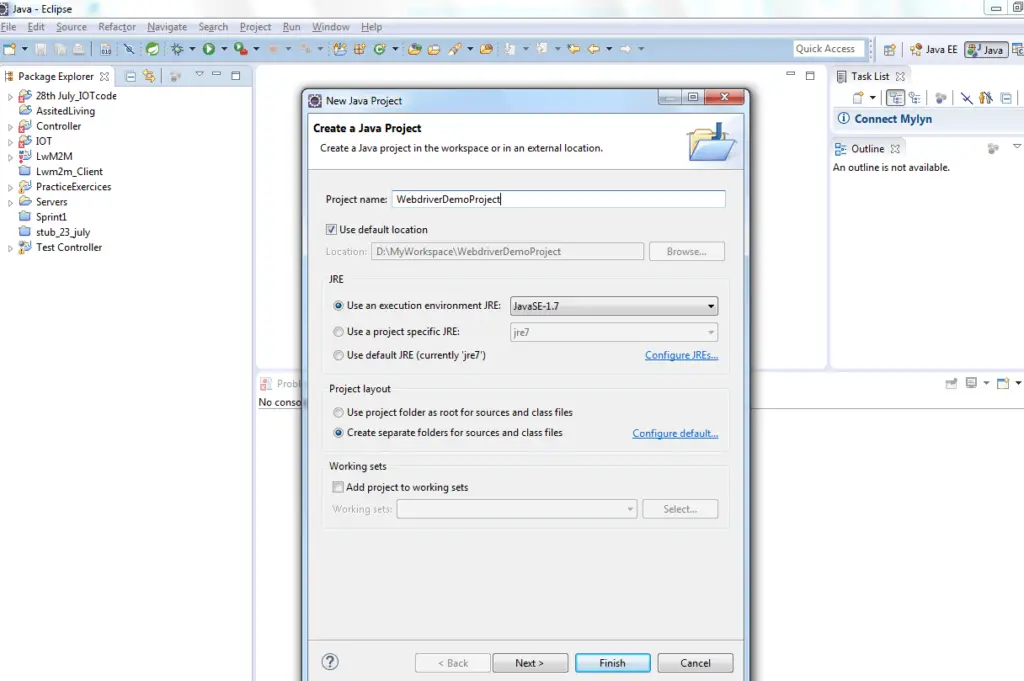
Step#2: Enter the name of the project Eg-WebdriverDemoProject
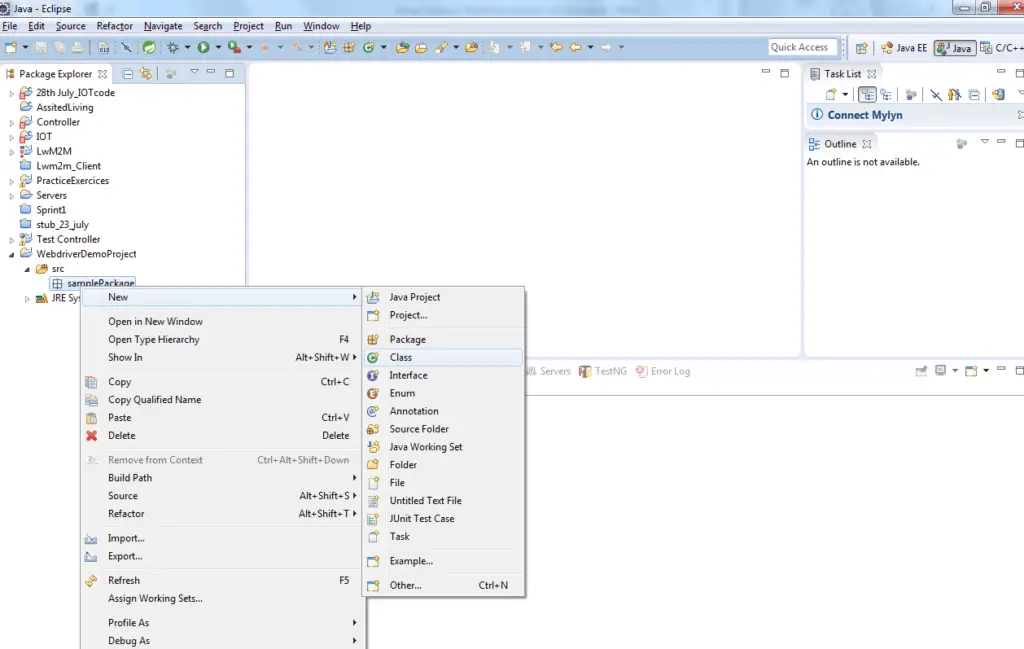
Step#3: Create a New Package
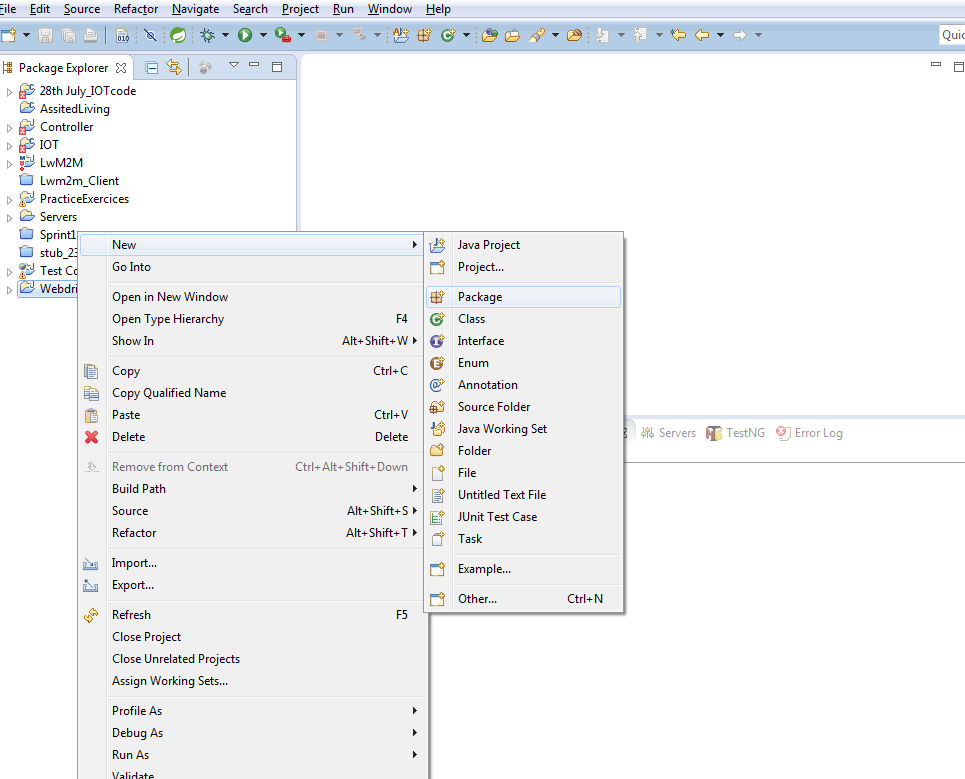
Right-click on the newly created project as a New-> Package.
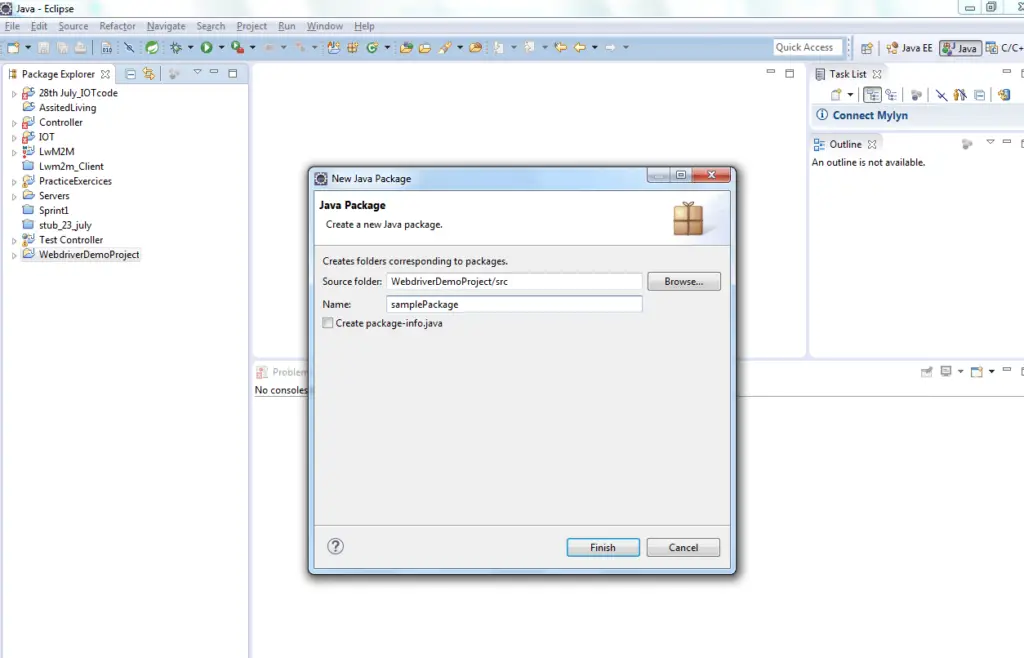
Give the name of the package, e.g. “<samplePackage>” and click on Finish
Step#4: Create a New Java Class
Right-click on the newly created package to create a Java class as New->Class.
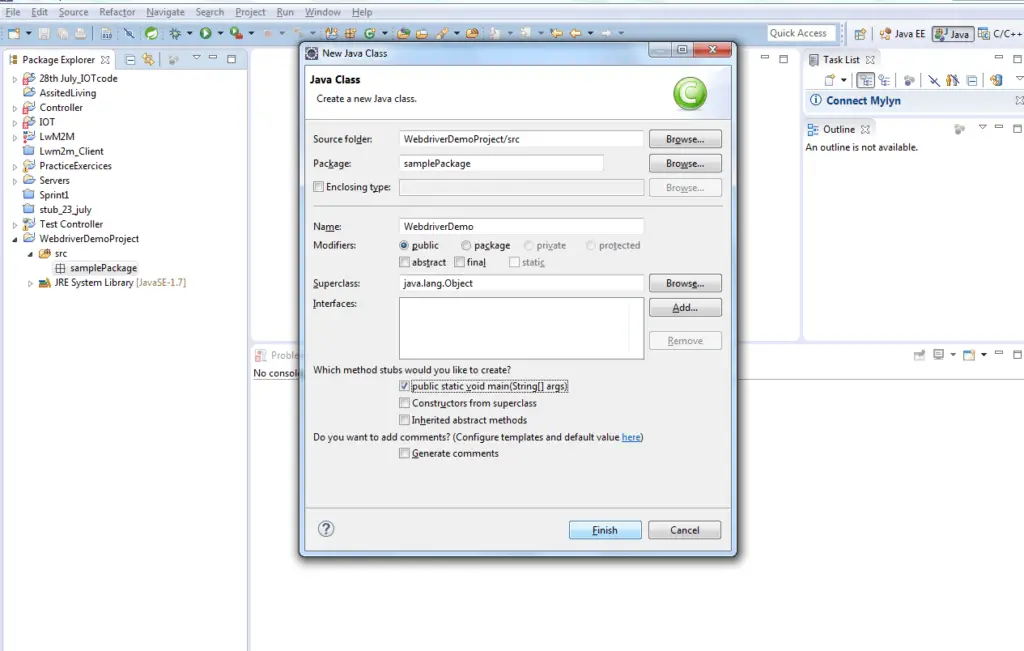
Give the name of the class file, e.g., –WebdriverDemo.
Select the checkbox for “public static void main (String[] args)” and click on Finish.
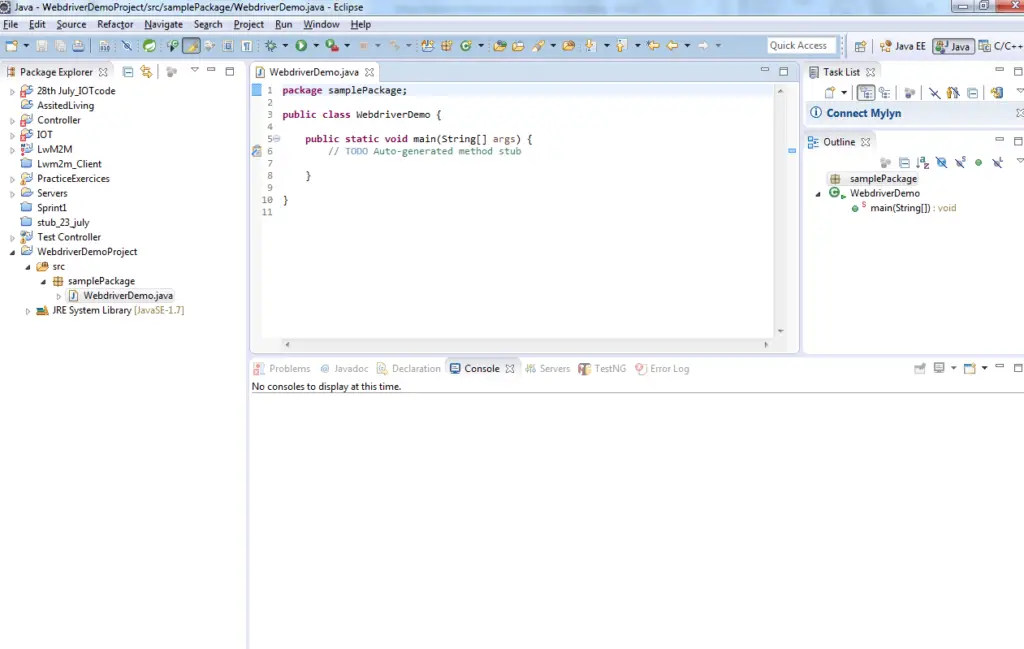
The newly created Java class file looks like this after successful creation.
Step#5: Download the required jar files
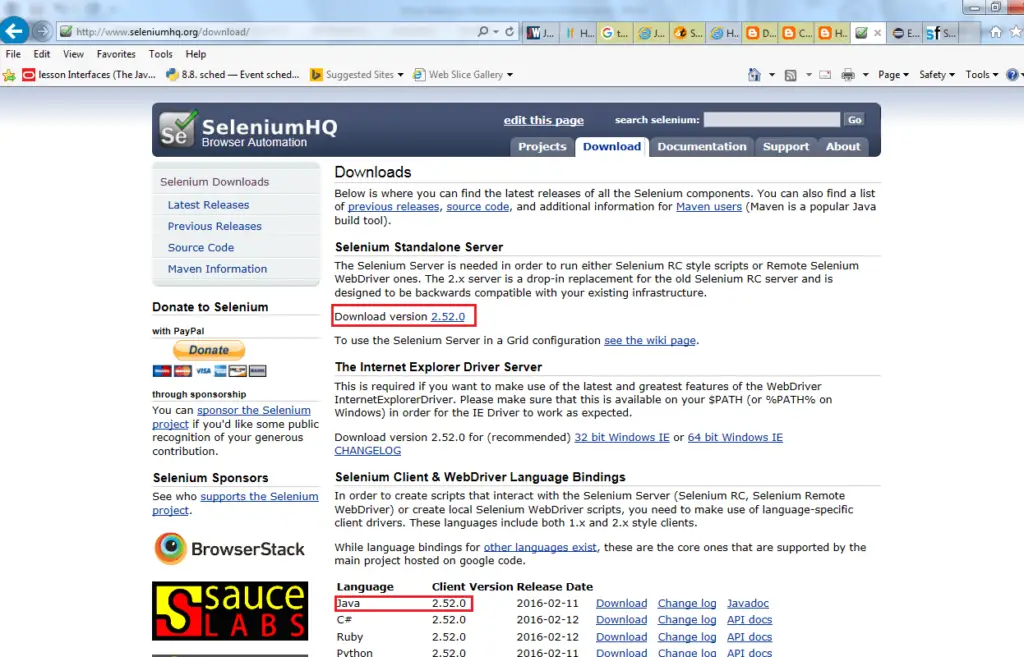
Before we can proceed with writing test scripts, we have to download the following jars to let Selenium test scripts execute.
Download Selenium Webdriver jars (highlighted in red) from the Selenium HQ Website, extract them, and place them in the “Jar Files” folder of “WebdriverDemoProject.”.
Download Apache POI API Jar Files.
1- It’s a favorite Java API of automation testers as it helps them read, write, and create Microsoft Excel files. It also supports other file formats like DOC, DOCX, and PPT.
2- For downloading the Apache POI API’s JAR files, go to the link (https://poi.apache.org/download.html) and click on “poi-bin-3.14-beta1-20151223.tar.gz” under the Binary Distribution table. It’ll take you to the mirror sites listing page to download the Apache POI API Jar files folder. Click on any mirror site link, and download and extract the folder.
3- You will find the following JAR files inside the above folder. Copy all these software files and paste them into the “Lib” folder of “WebdriverDemoProject.”
- Poi-3.14-beta1-20151223.jar
- Poi-OOXML-3.14-beta1-20151223.jar
- Poi-OOXML-schemas-3.14-beta1-20151223.jar
- XMLbeans-2.3.0.jar (Inside the OOXML-lib folder)
- dom4j-1.6.1.jar (Inside the OOXML-lib folder)
(Note: The above jar files could be upgraded in the future. So, always use the latest version only.).
Download the Apache log4j Jar File.
- Log4j is used to generate logs during test execution. We can download Apache log4j files from the link (https://logging.apache.org/log4j/1.2/download.html)
- Click on the zip folder link, and it will take you to <zip> folder mirror links to download the folder. Click on the mirror link to download the folder.
- Extract the zip folder inside the folder, and you’ll find the log4j 1.2.17.jar file. Copy this file and save it in the “Lib” folder of “WebdriverDemoProject.”
Now the “Lib” folder has all the required files. We will add more jar files in the future if necessary.
Step-6: Add Jar Files in Project Build Path
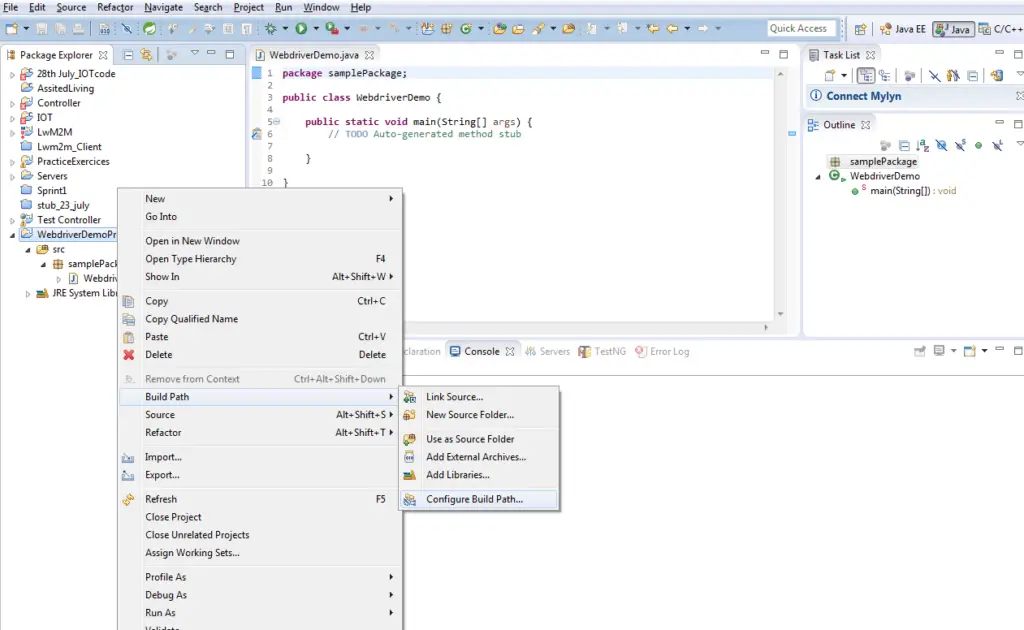
Right-click on the project “WebdriverDemoProject.” Select Build Path->Configure Build Path.
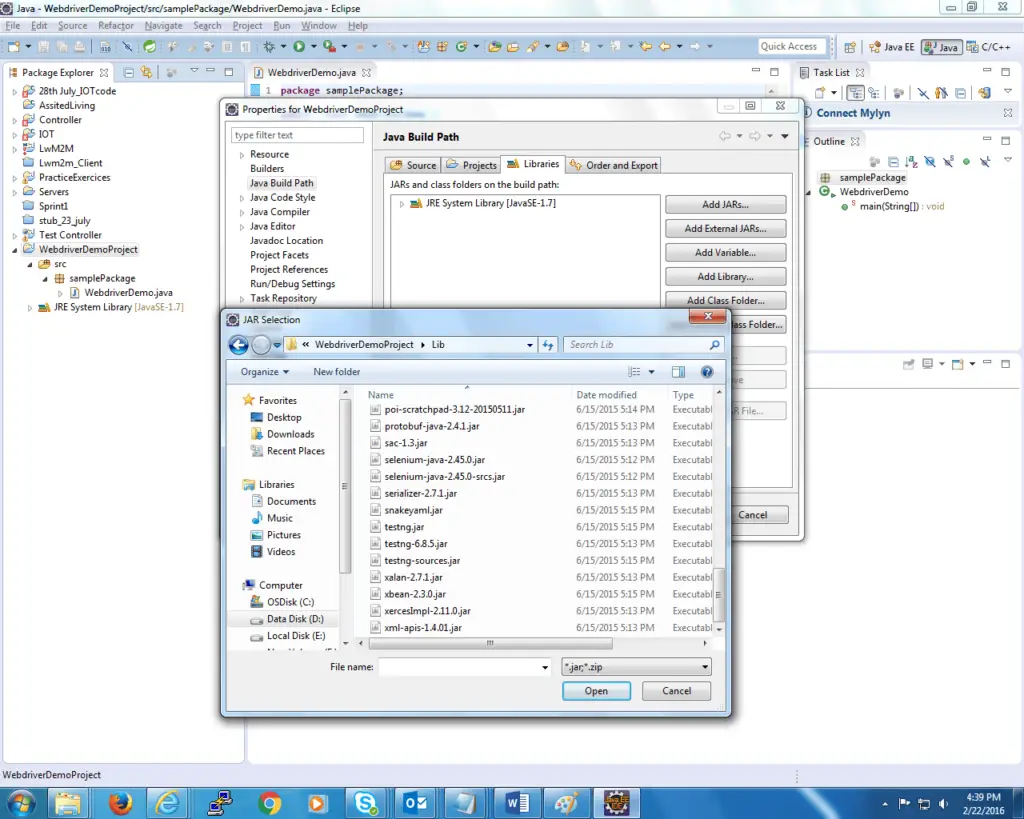
Move to the Libraries tab and click on the “Add External JARs” option. It will open a pop-up for selecting the downloaded JARs.
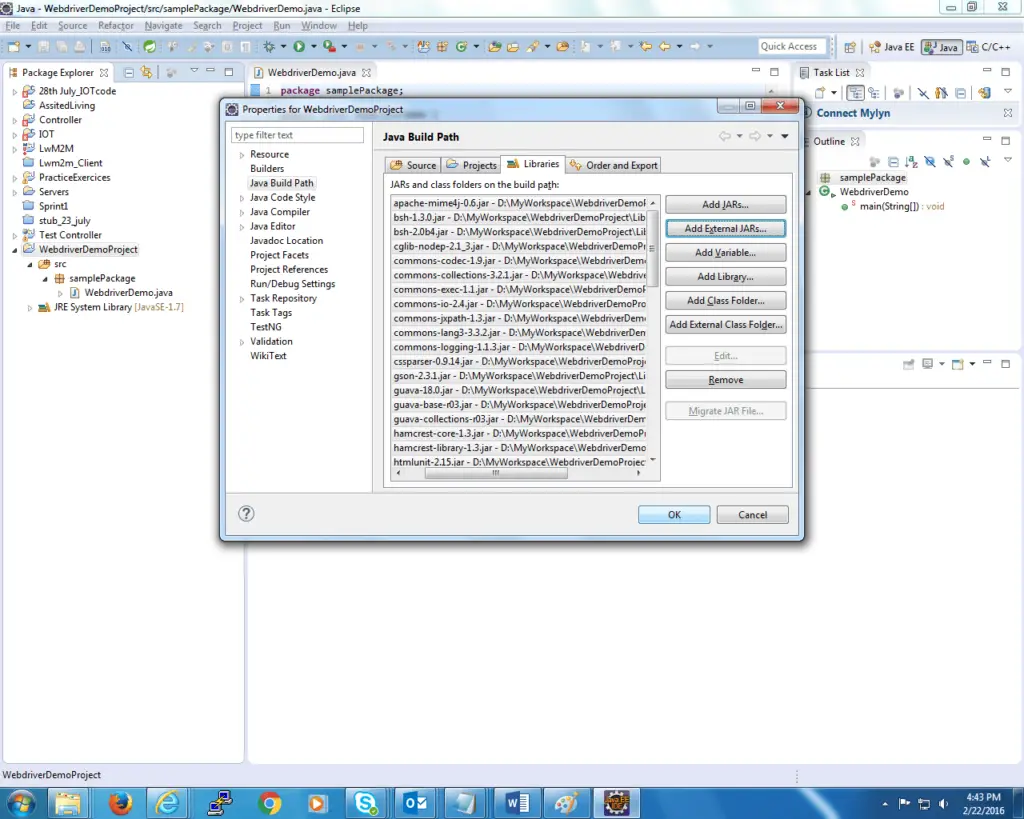
Navigate to the “Lib” folder in which all the JARs are available. Select all of them (using Ctrl+A) and then click on the “Open” button. It’ll add all the JAR files to your project’s build path.
Now click on the “OK” switch to close the window.
So far, you’ve added all the jar files in the “WebdriverDemoProject” build path. And you are all settled to use the services in your project like the Apache POI, Webdriver, etc.
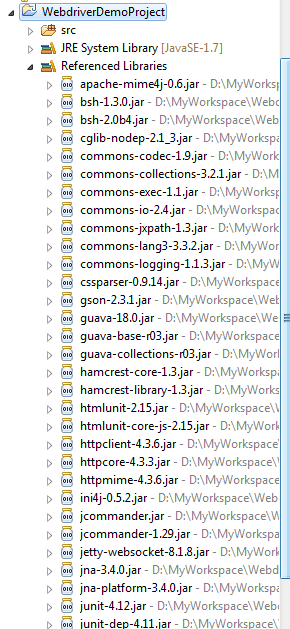
A new folder named “Referenced Libraries” gets created in “WebdriverDemoProject,” and all libraries get added under this folder, as shown in the below image.
With this, you are all set to start writing your Selenium Webdriver test Scripts !!!
Eclipse IDE – Quick Tips to Setup Selenium Webdriver Project
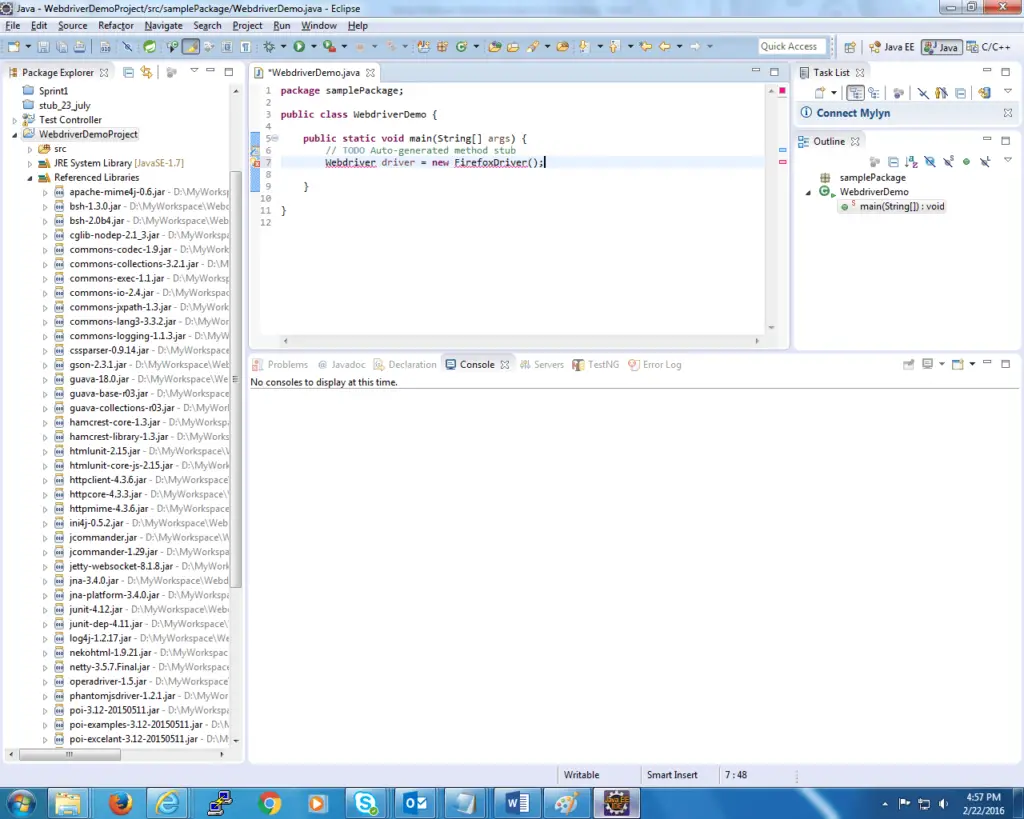
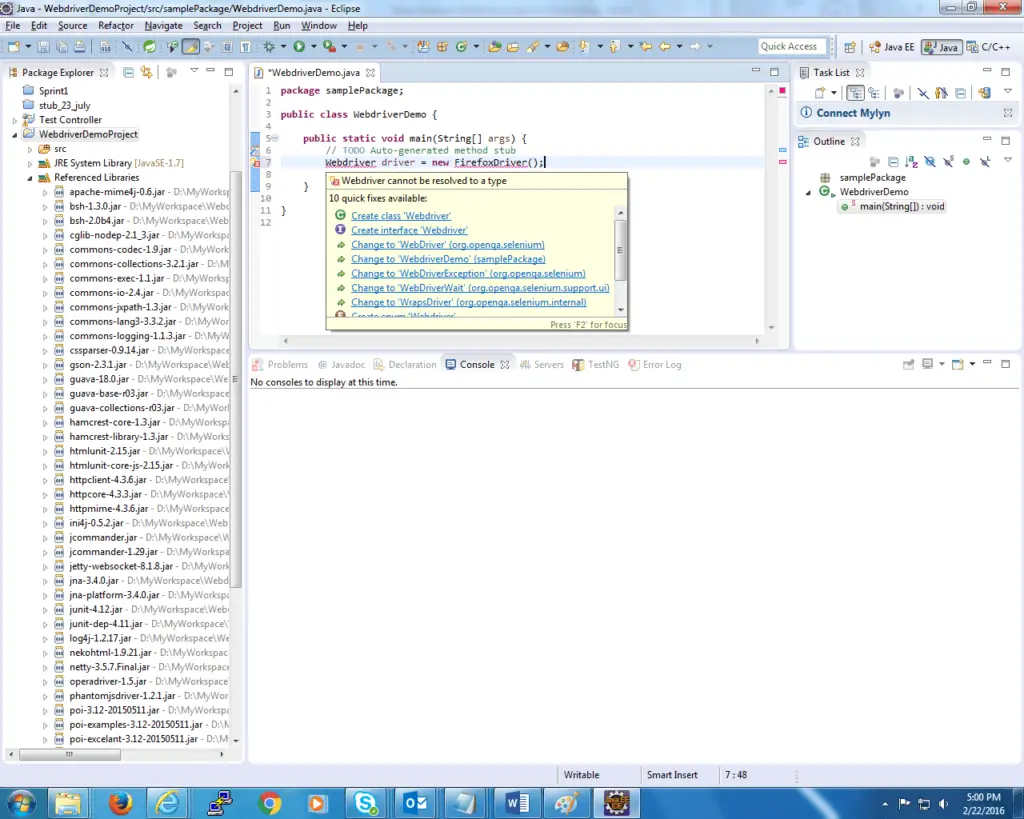
- Eclipse IDE brings in the auto-suggest feature, which is quite handy in determining the Selenium Webdriver methods and their parameters. When you add the first line of code to create a Webdriver object like the example shown in the snapshot.
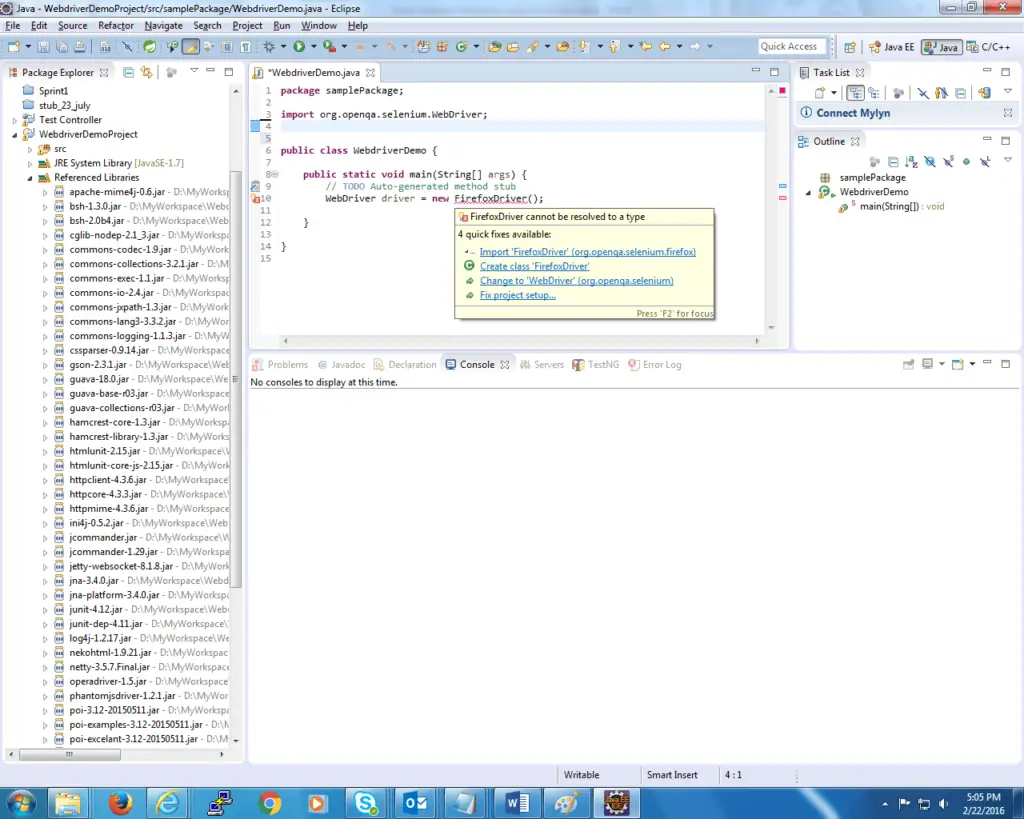
- You may see some errors. To resolve them, hover the mouse near the Webdriver line containing the issue, and you will see the Autosuggest option, which suggests the possible fix for the errors. In this example importing the Webdriver file will remove the mistake, so choose that option.
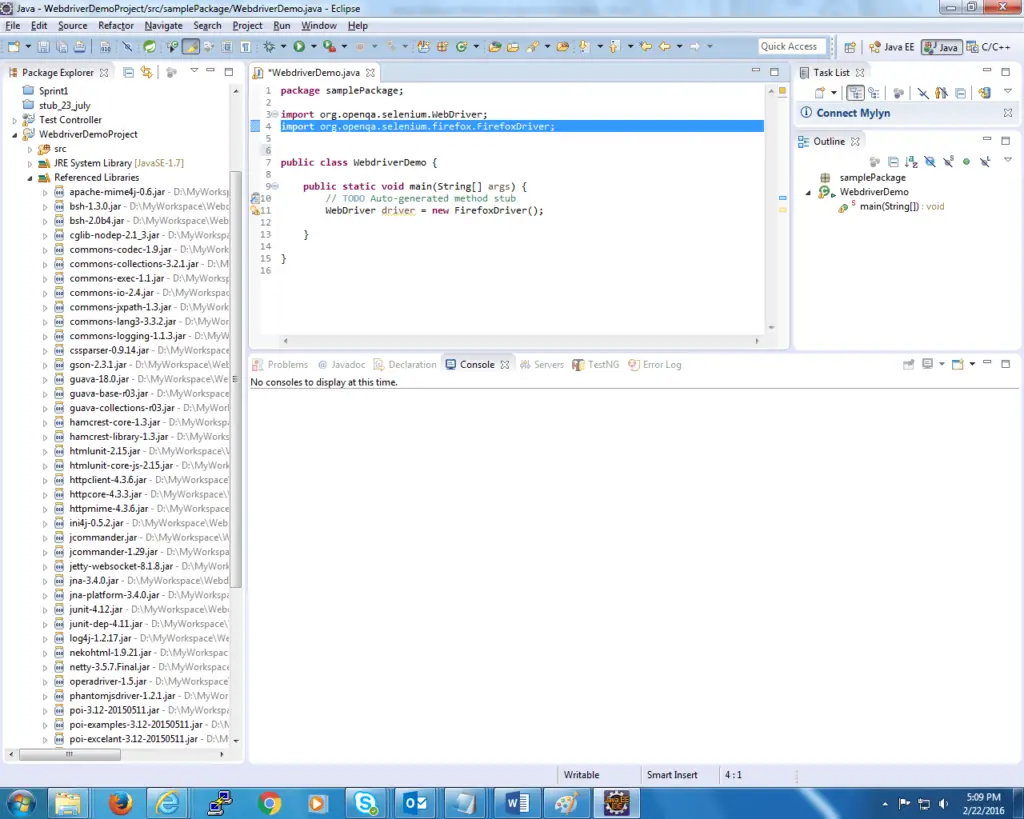
- Again mouse hovers on the Firefox Driver and from the Autosuggest options list, select the option to import the Firefox Driver.
So, that was about the Eclipse IDE’s Autosuggest option, which is indeed a great help in writing the test scripts.
Final Word – Setup Selenium Webdriver Project
In this blog post, we’ve tried to showcase one of the quickest methods to set up the Selenium Webdriver project in Eclipse. If any of you have any suggestions to optimize it further, then please share them with us in the comment box. Also, please use the share icons around and help us to reach this post to a broader audience.
Best,
TechBeamers


