This tutorial provides you with all the steps you need to build a Selenium Python test suite using Python’s unit test framework. Simultaneously, we’ll provide the full working code of the test suite that you can reuse and modify as per your needs.
- Introduction to Selenium Python and Unittest
- Understand Python Unittest Framework and Its Features
- Start Writing Selenium Python Test Scripts Using Unittest
- Assertions in Python Unittest Framework
- Create Selenium Python Test Suite Using Unittest
- Generate HTML Test Suite Execution Report
- Key Takeaways from Selenium Python and Unittest Guide
Introduction to Selenium Python and Unittest
With Selenium Python, you can easily automate any web application and cover its flows in multiple browsers. However, it still lacks many key features such as creating data-driven tests, setting up test pre and post-conditions, and much more.
Since not all these features are available in Selenium WebDriver, so we’ll utilize Python’s unit testing framework a.k.a. Unittest. Let’s now look at the list of topics that we’re going to cover in this Selenium Python test suite tutorial.
Understand Python Unittest Framework and Its Features
Python Unittest library inherits its root from a third-party module known as PyUnit. It was Steve Purcell who ideated PyUnit based on the famous JUnit framework. And later it grew as an official Python module beginning from version 2.5.
Like the JUnit, the Python unit test module splits up its functionality among five key components. All five elements work in tandem to support automation testing. Let’s discuss each of them one by one in detail.
Five Components of Python Unittest Framework

1. Test Loader – It’s a Python class that loads test cases and suites created locally or from an external data source like a file. It releases a TestSuite object that carries those cases and suites.
2. Test Case – The TestCase class holds the test handlers and provides hooks for preparing each handler and for cleaning up after the execution.
3. Test Suite – It acts as a container for grouping test cases. With the help of a test suite, you can combine a set of test cases representing specific functionalities of the application under test.
4. Test Runner – It provides a runnable interface for the execution of tests and delivers the results to the user. It can use channels like a GUI, a textual medium, or return a standard code to notify the results of test execution.
5. Test Report – This component organizes test results, and displays the pass/fail status of the executed test cases. It even provides the details of steps, a summary of the overall run, and the time lapsed in execution.
Prepare a Test Case Class to Automate a Scenario
We can create one or more tests by inheriting the TestCase class available in the unit test module. To add a case, we also need to provide a corresponding test method (a handler) to the derived class. To finalize a test case, we can use assert or any of its variations for reporting test status.
Here are some of the most common assert functions used almost in all tests.
a. Use assertEqual() to check for an expected result.
b. Use assertTrue() to verify a condition.
c. Use assertRaises() to verify that an expected exception gets raised.
In addition to the test handler, we can also add routines like setup() and tearDown() to manage the creation and disposition of any objects or conditions that are mandatory for a test.
Let’s now start using the Unit test library and write a simple test by inheriting the TestCase class. For this, you’ll need to import the <unittest> module and define a class that inherits the TestCase class.
Look at the code below to get a feel of the test class.
import unittest
from selenium import webdriver

class SearchText(unittest.TestCase):
Using setUp() to Manage Test Pre-requisites
The <setUp()> method works as an entry point for the test cases. We can use it to run a fixed set of actions before executing a test or all the tests defined in the class.
These are prerequisites which may include the following test setup preparation tasks.
1. Create an instance of a browser driver.
2. Navigate to a base URL.
3. Load test data for execution.
4. Open log files for recording inputs, statuses, and errors.
It takes no arguments and doesn’t return anything. If a script has the setUp() method defined, then the runner will call it first before running any of the test handlers.
In our example, we are using the setup() call to create an instance of Firefox, set up the properties, and navigate to the main page of the application before executing the actual test.
import unittest
from selenium import webdriver

class SearchText(unittest.TestCase):
    def setUp(self):
        # Start the browser
        self.driver = webdriver.Firefox()
        self.driver.implicitly_wait(30)
        self.driver.maximize_window()
        # Go to the app home page
        self.driver.get("http://www.google.com/")
Start Writing Selenium Python Test Scripts Using Unittest
Create Your First Selenium Test in Python with Unittest
After creating a setup() method, we can now write some tests to verify the web application’s functionality. So, first of all, let’s define our use case.
Use Case – In this example, we will search for a text in Google and verify if the search returns a list of items
Similar to <setup()>, test methods get implemented in the TestCase class. While adding these, it’s a good practice to prefix their names with the word test. Having such a name helps Test Runner distinguish between a test and other methods. Check out the below script to demonstrate the given Selenium Python example.
import unittest
from selenium import webdriver

class SearchText(unittest.TestCase):
    def setUp(self):
        # Start the browser
        self.driver = webdriver.Firefox()
        self.driver.implicitly_wait(30)
        self.driver.maximize_window()
        # Go to the app home page
        self.driver.get("http://www.google.com/")

    def test_search_by_text(self):
        # Find the search box
        self.search_field = self.driver.find_element_by_name("q")

        # Input the text for search and submit
        self.search_field.send_keys("Selenium WebDriver Interview questions")
        self.search_field.submit()

        # Get the list of elements which are displayed after the search
        #currently on result page usingfind_elements_by_class_namemethod

        lists = self.driver.find_elements_by_class_name("r")
        no = len(lists)
        self.assertEqual(10, len(lists))
Define Cleanup Strategy to Free Resources Post-Test Execution
Once the test execution finishes, the prerequisites specified in the setup() have to be cleaned up.
So to achieve this, the base TestCase class provides another method i.e. tearDown() which the runner calls after test execution. It lets us clean the values initialized at the beginning of the test via the setup().
In our example, when the test execution ends, we no longer need the instance of Firefox. So we will close it in the tearDown(), as shown in the following code.
import unittest
from selenium import webdriver

class SearchText(unittest.TestCase):
    def setUp(self):
        # Open a new browser session
        self.driver = webdriver.Firefox()
        self.driver.implicitly_wait(30)
        self.driver.maximize_window()
        # navigate to the application home page
        self.driver.get("http://www.google.com/")

    def test_search_by_text(self):
        # Get the search box
        self.search_field = self.driver.find_element_by_name("q")

        # Enter the search term and submit
        self.search_field.send_keys("Selenium WebDriver Interview questions")
        self.search_field.submit()

        # Get the list of elements which are displayed after the search
        #currently on result page usingfind_elements_by_class_namemethod

        lists = self.driver.find_elements_by_class_name("r")
        no = len(lists)
        self.assertEqual(11, len(lists))

    def tearDown(self):
        # Close the window
        self.driver.quit()
How to Execute the Test Case from Commandline?
Running the tests from the command line would require us to add a call to the main() method in the test script. We’ll also pass a verbosity argument to the main(). It’ll get the test result details displayed on the console.
Below is the piece of code to facilitate command line execution. We’ll need to add it to our test script towards the end.
if __name__ == '__main__':
    unittest.main()
After adding these lines, save the test as a standard Python script and name it as <selenium-python-test.py>. Then, try to execute it from the command line by using the following command.
python selenium-python-test.pyAfter running the tests, the results would be displayed on the console along with the executive summary as captured in the following screenshot.

In addition to the results summary, there is a block of text getting printed as well to describe what went wrong. Look at the following screenshot to see what happens when we change the expected value (11 to 10) to something else.
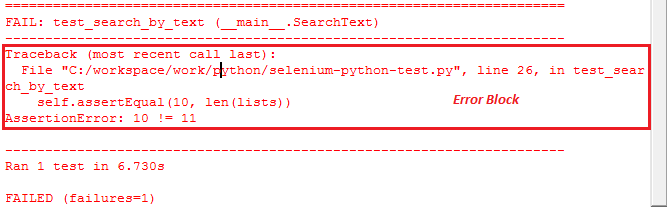
As you can see from the logs, it’s easy to find the culprit test method that generated the failure. Use the backtrace to track down the code flow that led to the failure. Also, there is an AssertionError thrown after detecting a mismatch between the expected and the actual output.
Add One More Selenium Python Test Case
So far, we’ve automated one simple test case. But we can add as many cases as expected in the TestCase class. It’ll also help in creating logical groups of tests that are related to specific functionality. So let’s add another test to the TestCase class. Name the new method starting with the word test, as shown in the following code.
def test_search_by_name(self):
# Get the search box
self.search_field = self.driver.find_element_by_name("q")
# Enter search term and submit
self.search_field.send_keys("Python unit test")
self.search_field.submit()
# Get the list of elements which are displayed after the search
# currently on result page by calling the below api
list_new = self.driver.find_elements_by_class_name("r")
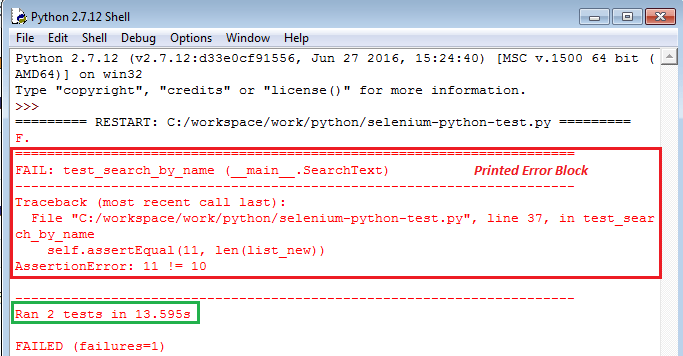
self.assertEqual(10, len(list_new))Executing the TestClass would result in the first opening and then closing of the two instances of Firefox. That’s how the setup() and tearDown() work for each test method. You can tally the results from the snapshot attached below.
Refactor setUp() and tearDown() Methods for Optimization
In the previous examples, we used the setup() call for creating instances of the Firefox driver. However, this approach led to the creation of a new instance of the web browser every time a new test case ran.
It was the setup() call that was causing this behavior as it runs before every test case. The Same case is with the tearDown() call which triggers every test case after it finishes executing.
So we can refactor our script to minimize resource usage. It means that we can share a single Firefox instance between the methods instead of creating a new instance every time.
It’s possible by using the setUpClass() and tearDownClass() methods along with the @classmethod decorator. These functions enable us to set the values at the class level rather than the method level. The values initialized at the class level are shared between the test methods.
Let’s see the above example with modified code to call the setUpClass() and tearDownClass() methods with the @classmethod decorator.
Selenium Python Test Script Example
import unittest
from selenium import webdriver

class SearchText(unittest.TestCase):
    @classmethod
    def setUpClass(inst):
        # Open a session
        inst.driver = webdriver.Firefox()
        inst.driver.implicitly_wait(30)
        inst.driver.maximize_window()
        # Go to the app home page
        inst.driver.get("http://www.google.com/")
        inst.driver.title

    def test_search_by_text(self):
        # Get the search box
        self.search_field = self.driver.find_element_by_name("q")
        self.search_field.clear()
        # Enter the search term and submit
        self.search_field.send_keys("Selenium Webdriver interview questions")
        self.search_field.submit()
        # Get the list of elements which are displayed after the search
        # currently on result page by using the below method
        lists = self.driver.find_elements_by_class_name("r")
        self.assertEqual(11, len(lists))

    def test_search_by_name(self):
        # Get the search box
        self.search_field = self.driver.find_element_by_name("q")
        # Enter the search term and submit
        self.search_field.send_keys("Python unit test")
        self.search_field.submit()
        # Get the list of elements which are displayed after the search
        # currently on result page by using the below api
        list_new = self.driver.find_elements_by_class_name("r")
        self.assertEqual(11, len(list_new))

    @classmethod
    def tearDownClass(inst):
        # close the browser window
        inst.driver.quit()

if __name__ == '__main__':
    unittest.main()
Upon executing the test, we can see that both tests are getting run in the same Firefox browser.
Assertions in Python Unittest Framework
The TestCase class of the Python Unittest library implements a list of assertions. We can use them to match actual values returned by the application with the expected values. With every method, we can specify a condition that must be true to continue executing the test.
The following three types of assertions are available.
1. Checking equivalence.
2. Logical comparison.
3. Acting in the case of exceptions.
While running a test, the execution moves to the next line only if the given assertion passes. Otherwise, the test would halt immediately prompting a failure message.
Let’s look at an important list of assert methods.
List of Assert Methods in Python Unittest Module
1. assertEqual(a, b [, msg]) or assertNotEqual(a,b[, msg]) – Check whether or not “a” and “b” match with each other. You can also pass a custom error message.
e.g. assertEqual(element.text,”10″)
2. assertTrue(x[,msg])) or assertFalse(x[,msg])) or assertIsNot(a, b[,msg])) –
Verify if the given expression evaluates to True or False.
e.g. assertTrue(element.is_displayed())
3. assertRaises(exc, fun, *args, **kwds) or assertRaisesRegexp(exc, r, fun, *args, **kwds) – Check whether the test step raises the specific Exception mentioned. One such example is to use this method to check NoSuchElementFoundException.
4. assertAlmostEqual(a, b) or assertNotAlmostEqual(a,b) – It compares the numeric values after rounding them to the number in the second argument.
5. assertGreater(a, b) or assertGreaterEqual(a,b) or assertLess(a,b) or assertLessEqual(a,b) – These methods are similar to the assertEqual() method.
6. assertRegexpMatches(s, r) or assertNotRegexpMatches(s, r) – Verify whether a regex search matches the text.
7. assertMultiLineEqual(a, b) – This method is an extension to the assertEqual(), designed for multiline strings.
8. assertListEqual(a, b) – This method checks whether the lists “a” and “b” match. It helps to work with the drop-down fields.
9. fail() – This method fails the test unconditionally. It allows the creation of custom conditional blocks.
Create Selenium Python Test Suite Using Unittest
The Unittest module has a TestSuite class which makes it easy to create an end-to-end Selenium Python Test Suite. With this feature, we can combine various tests into logical groups and turn them into a unified test suite. All of this is achievable by using the TestSuite, TestLoader, and TestRunner classes.
Before we get into the details of TestSuite, let’s add a new test to check the home page of the application under test. We’ll aggregate this test along with the previous search tests into a single test suite, as shown in the following code.
Basic Python Unit Test Script for Selenium
import unittest
from selenium import webdriver
from selenium.common.exceptions import NoSuchElementException
from selenium.webdriver.common.by import By

class HomePageTest(unittest.TestCase):
    @classmethod
    def setUp(inst):
        # create a new Firefox session """
        inst.driver = webdriver.Firefox()
        inst.driver.implicitly_wait(30)
        inst.driver.maximize_window()

        # go to the app home page """
        inst.driver.get("http://www.google.com/")

    def test_search_box(self):
        # check search box exists on Home page
        self.assertTrue(self.is_element_present(By.NAME,"q"))

    def test_language_settings(self):
        # check language options on Home page
        self.assertTrue(self.is_element_present(By.ID,"_eEe"))

    def test_images_link(self):
        # check images link on Home page
        images_link = self.driver.find_element_by_link_text("Images")
        images_link.click()
        # check search field exists on Images page
        self.assertTrue(self.is_element_present(By.NAME,"q"))
        self.search_field = self.driver.find_element_by_name("q")
        # enter the search term and submit
        self.search_field.send_keys("Selenium Webdriver framework architecture diagram")
        self.search_field.submit()

    @classmethod
    def tearDown(inst):
        # close the browser window
        inst.driver.quit()

    def is_element_present(self, how, what):
        """
        Helper method to confirm the presence of an element on page
        :params how: By locator type
        :params what: locator value
        """
        try: self.driver.find_element(by=how, value=what)
        except NoSuchElementException: return False
        return True

if __name__ == '__main__':
    unittest.main(verbosity=2)
Group Test Cases into a Test Suite
You would have now very well understood that we’ll use the TestSuite class for defining and running the test suite. And we can add multiple test cases to it. Also, we need to use TestLoader and TextTestRunner classes to create and run a test suite. Please refer to the below code.
import unittest
from SeleniumPythonRefactorTestCase import SearchText
from SeleniumPythonMultipleTests import HomePageTest

# get all tests from SearchText and HomePageTest
search_text = unittest.TestLoader().loadTestsFromTestCase(SearchText)
home_page_test = unittest.TestLoader().loadTestsFromTestCase(HomePageTest)

# create a test suite combining search_text and home_page_test
test_suite = unittest.TestSuite([home_page_test, search_text])

# run the suite
unittest.TextTestRunner(verbosity=2).run(test_suite)
Execute the Test Suite
Let’s find out how can we run the entire Selenium Python test suite in one go.
The TestLoader class reads all the test methods from the specified test files that contain the definition of the test suite. Then, the TestRunner takes control of the test suite and runs all the tests specified. Below is the command to run the new test suite script.
python SeleniumPythonTestSuite.pyIt’ll run all the tests from the SearchText and HomePage classes and generate the following output.
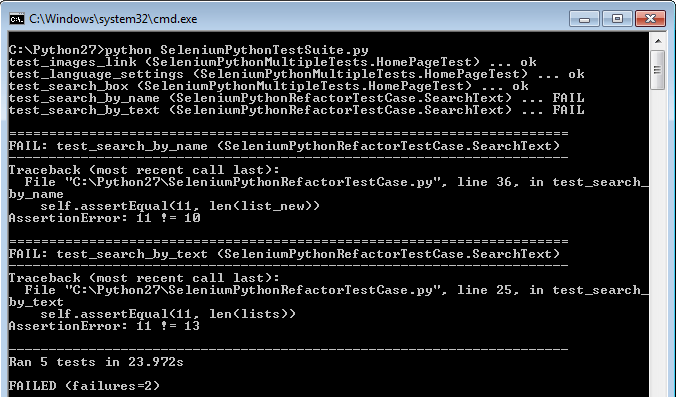
Generate HTML Test Suite Execution Report
By default, the Python Unittest library emits the test output on the terminal console. If you want to share the results with management and stakeholders, then sending console logs isn’t the appropriate way.
So you need to generate a report that looks presentable and professional. A summary report formatted nicely, with drill-down access to the details is what is required.
Since the unit test library doesn’t have the ability to produce such a report, you should use the HTMLTestRunner extension. You can go to its website and download it for testing.
To integrate HTMLTestRunnersupport in our test script, we need to create an output file to store the actual report, configure the HTMLTestRunner options, and run the tests in the following manner.
Generate HTML Test Report Using Python Unittest
import unittest
import HTMLTestRunner
import os
from SeleniumPythonRefactorTestCase import SearchText
from SeleniumPythonMultipleTests import HomePageTest

# Get the dir path to output report file
dir = os.getcwd()

# Get all tests from SearchText and HomePageTest
search_text = unittest.TestLoader().loadTestsFromTestCase(SearchText)
home_page_test = unittest.TestLoader().loadTestsFromTestCase(HomePageTest)

# Create a test suite combining search_text and home_page_test
test_suite = unittest.TestSuite([home_page_test, search_text])

# Open the report file
outfile = open(dir + "\SeleniumPythonTestSummary.html", "w")

# Set the HTMLTestRunner config options
runner = HTMLTestRunner.HTMLTestRunner(stream=outfile,title='Test Report', description='Acceptance Tests')

# Run the test suite using HTMLTestRunner
runner.run(test_suite)
After executing the test suite, we’ll see that HTMLTestRunner runs all the tests as does the test runner of the unit test library. At the end of the test, it’ll produce a report file as captured in the following snapshot.
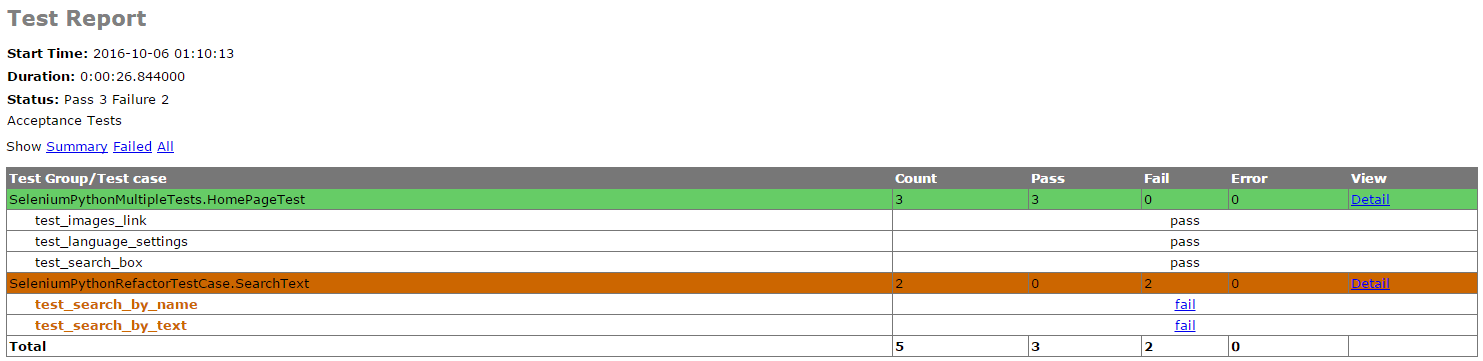
You can now look at the attached HTML report and see that it presents all the required details of test execution. From the failure links, you can even drill down the actual problem. Overall, it’s a nice-looking report which you can proudly share with all the stakeholders.
Key Takeaways from Selenium Python and Unittest Guide
We hope you enjoyed learning and building your test suite with the step-by-step instructions given above. Next, you should check out some of our popular tutorials below.
- Seven Types of Test Automation Frameworks
- Latest Automation Testing Interview Questions
- How to Use Internet Explorer Driver with Selenium
- 100+ Manual Testing Interview Questions
- Selenium IDE Basics
- Static Method in Python
We hope you enjoyed reading this tutorial.
Have a great day!
TechBeamers